Installation and First Steps
System Requirements
Your computer must meet the system requirements to use Artec 3D scanners.
Note
Third-party scanners are only available in Artec Studio Ultimate!
In addition, take note of the following:
- Real-time fusion mode
- (Scanning With Real-Time Fusion): ensure that your graphics card has at least 1 GB of memory or your Intel HD Graphics chipset is 4600 or higher (consult the FAQ article for more information).
- Using Intel RealSense camera
- requires your computer to run Windows 8 (Windows 10 for SR300) and to feature at least 4th Generation Intel Core processor and USB3.0
- Using Kinect v2
- requires your computer to run Windows 8 and to feature 3.1 GHz (or faster) processor with physical dual-core (2 logical cores per physical) and USB3.0 based on Intel or Renesas chipset.
- Using multiple scanners
- (Multicapturing) requires your workstation to integrate as many independent USB host controllers as connected scanning devices. Upgrading your hardware with PCI/PCI Express USB cards may provide the required number of hosts.
User Account
To install Artec Studio and keep it up to date, register for a free account at my.artec3d. Registration is also required to activate an Artec 3D scanner. In addition, the site allows you to track all your Artec devices and products.
Your account at my.artec3d will be valid for all Artec sites and services (including viewshape.com).

Figure 21 my.artec3d welcome screen.
To register, follow these steps:
- Go to my.artec3d and click Sign up
- Fill in all the fields in the registration form and click Create account
- Receive a registration email that contains a confirmation link.
- Click the link or copy it to your browser to confirm your registration and go straight to your my.artec3d account.
Scanner Activation
Before using your new Artec 3D scanner, you must activate it and link it to an account at my.artec3d. You can do so with the help of Artec Installation Center—a standalone utility available for download from my.artec3d. If you’re a new user and don’t yet have Artec Installation Center, please read Running Artec Installation Center below. Otherwise, proceed to 3D Scanner Activation Using Artec Installation Center.
Warning
Do not connect your scanner to the USB port before installing Artec Installation Center.
Running Artec Installation Center
To use Artec Installation Center, first ensure that your computer is connected to Internet. Any computer with USB2.0 or USB3.0 ports will work. If necessary, you will be able to install and activate Artec Studio on a separate computer later. Also make sure that you already have a my.artec3d account; if not, see User Account.
- Log into your my.artec3d account and download Artec Installation Center. The link for the Artec Installation Center executable is available on site’s the main screen.
- After downloading, open the folder that contains the executable and run it. Follow the instructions on the installation screens. Once Artec Installation Center is installed, you will see a dialog requesting your email address and password. Use your my.artec3d account to log in as Figure 22 shows.
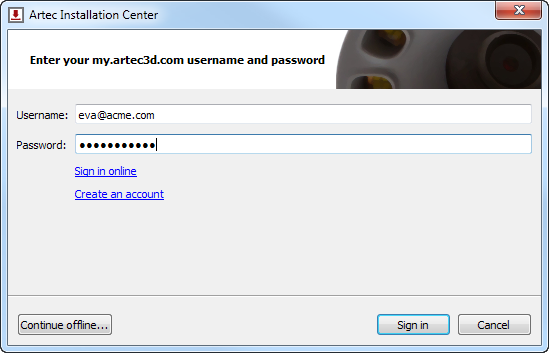
Figure 22 Authentication for Artec Installation Center
3D Scanner Activation Using Artec Installation Center
To activate a 3D scanner using Artec Installation Center, make sure your computer is connected to the Internet and that you have installed the application.
- Run Artec Installation Center (go to the Start menu: click Start → All Programs → Artec Group → Artec Installation Center) to bring up the window shown in Figure 24.
- Connect your new Artec 3D scanner to the computer and wait until Windows detects the device and installs the necessary drivers. You may see a notification similar to one shown in Figure 23.
- Go to Artec Installation Center, click Refresh and wait for the new 3D scanner to appear in the hardware box (see Figure 24). Click Activate (to the right of the serial number) to enable your 3D scanner. The status of the device should change to Activated, as Figure 25 shows.

Figure 23 Windows notification indicating device installation.

Figure 24 Activate button for 3D scanner

Figure 25 3D scanner activated
Artec Studio Installation
There are two ways to download and install Artec Studio:
- Through Artec Installation Center (either during the installation process or by clicking Install in the application, as Figure 26 shows)
- From my.artec3d—log into the site, go to the My applications page and download the executable (see Figure 27)

Figure 26 Artec Installation Center is ready to install Artec Studio.
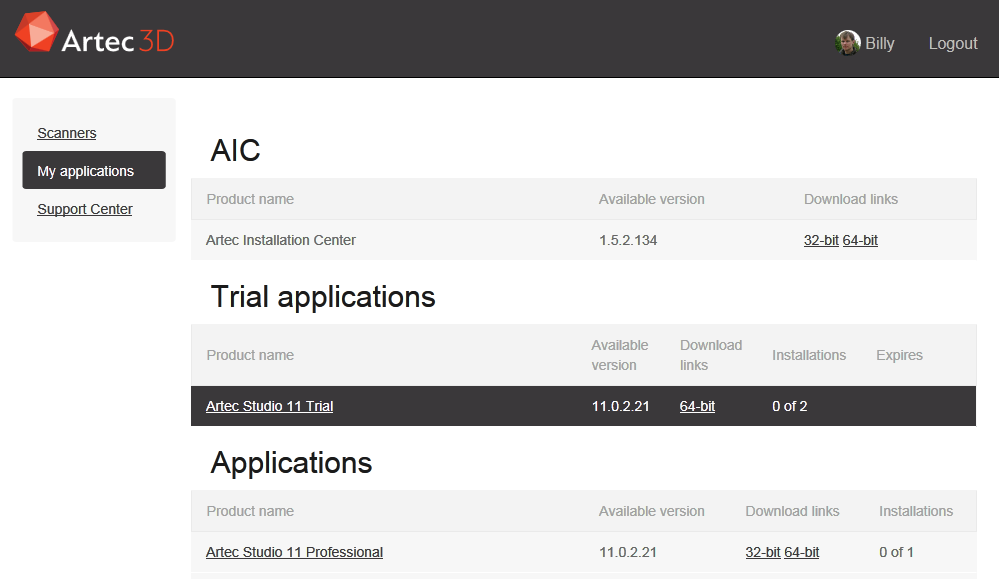
Figure 27 Portion of My applications page at my.artec3d.
If you download the executable, run it to begin installation; otherwise, click Install in Artec Installation Center. To continue with the installation, click Next and proceed to the license agreement (see Figure 28). After reviewing the agreement, accept it by clicking Yes.
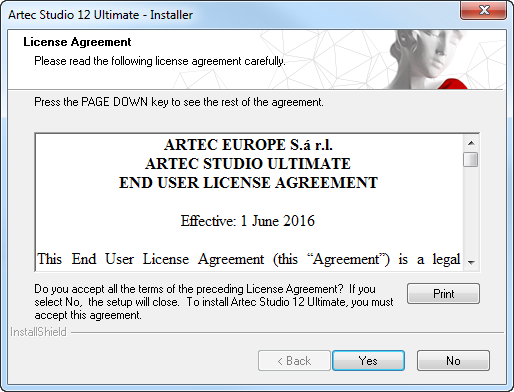
Figure 28 License agreement
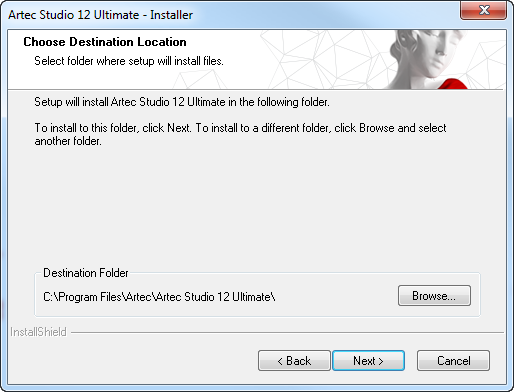
Figure 29 Installation location
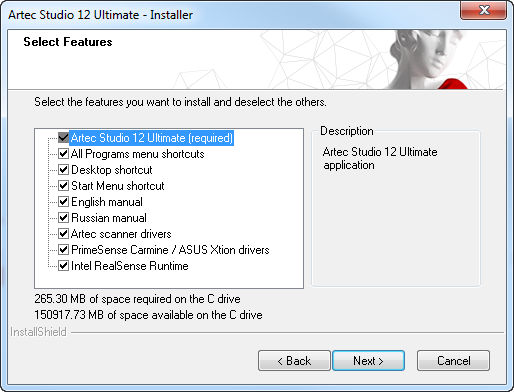
Figure 30 Select components to install
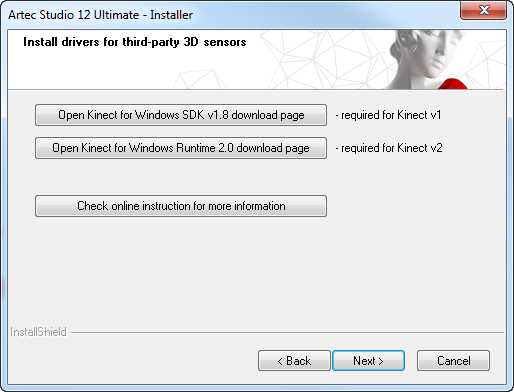
Figure 31 Third-party 3D-sensor driver selection
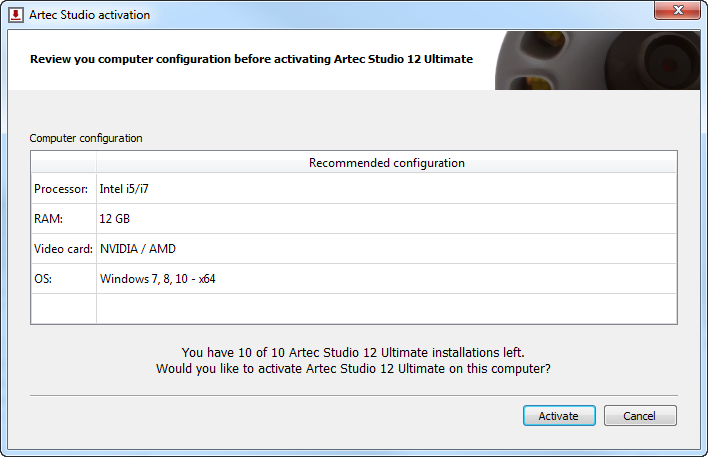
Figure 32 Artec Installation Center showing Artec Studio activation window
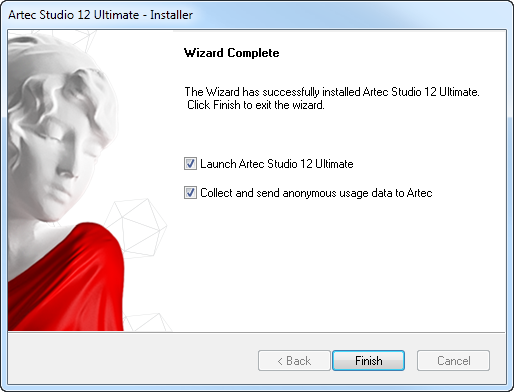
Figure 33 Finish installation
Specify the path to the installation folder (we recommend using the default location) as Figure 29 shows, then select the components you would like to install (see Figure 30):
| Program-menu shortcuts: | |
|---|---|
| create icon in the Start menu | |
| Desktop shortcut: | |
| create icon on the desktop | |
| Start-menu shortcut: | |
| add shortcuts to the Start menu and Quick Launch panel | |
| English manual: | install user manual in English |
| Install Artec Scanner Drivers: | |
| install drivers for Artec 3D scanners | |
| PrimeSense Carmine / Asus Xtion drivers: | |
| install drivers for PrimeSense/Asus 3D sensors | |
| Intel RealSense Runtime: | |
| install drivers for Intel RealSense cameras | |
By default, the application will create all of the above icons and install the user manual and Artec 3D-scanner drivers. To continue with the installation, click Next.
If you have yet to install Artec Installation Center, a login dialog will appear, as Figure 22 shows. If you are not connected to the Internet, consult Offline Activation regarding offline activation of Artec Studio.
If you have yet to link to your account the computer on which you are installing Artec Studio, you will see the activation confirmation shown in Figure 32.
When the installation is complete (see Figure 33), the installer will offer to launch Artec Studio.
Offline Activation
If the computer on which you are installing Artec Studio lacks an Internet connection for security or other reasons, you may use the offline activation procedure to activate the software.
Note
Copies of Artec Studio activated offline cannot be deactivated, so use this option only if absolutely necessary.
Note
Before conducting offline activation, make sure the scanner (see Scanner Activation) and Artec Studio are tied to your my.artec3d account.
For offline activation, you need the following:
- Another computer connected to the Internet
- Artec Studio installation package (preferably, download it from my.artec3d)
- Flash drive or another storage medium to transfer files from the Internet-connected computer to the computer that will run Artec Studio
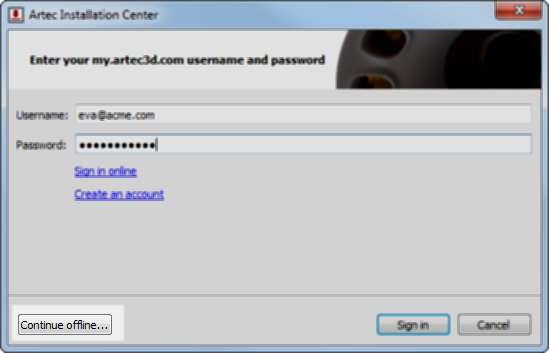
Figure 34 Artec Installation Center authentication dialog
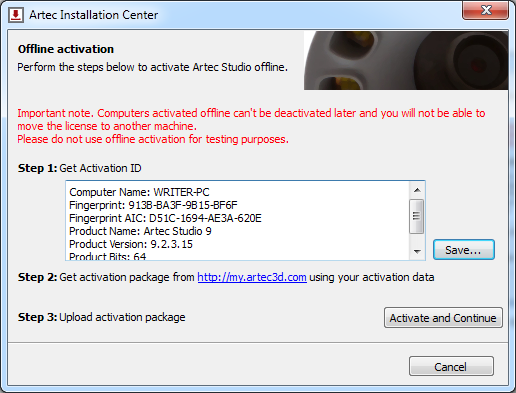
Figure 35 Offline-activation window
Installation and activation procedure:
- Start Artec Studio installation.
- During installation the login/password dialog will be displayed as Figure 34 shows. Click Continue offline
- In the offline-activation dialog (Figure 35), click Save... and save generated Activation ID file to a flash drive or other storage medium.
- Log into your my.artec3d account and open My applications page using the Internet-connected computer.
- Find Artec Studio and click on it. A new page will appear, as Figure 36 shows.
- Click the Activate application offline link then the Select file button and specify the Activation ID file path. Next, click Activate.
- A new dialog will allow you to download an Offline Activation Data file; save it to the flash drive.
- Return to the computer on which you are installing Artec Studio. Click Activate and Continue and specify the Offline Activation Data file.
Note
Once you create the Offline Activation Data File, my.artec3d will decrease the number of available activations by one.
Once you complete all the steps described above, your copy of Artec Studio will be activated and all of your Artec 3D scanners will be installed on the non-Internet-connected computer.

Figure 36 Offline activation at my.artec3d.
Note
If later you purchase another Artec 3D scanner, you must reinstall the application and repeat the activation procedure described above to copy the new scanner’s data files to your computer.
Deactivation
Note that deactivation is only possible for computers on which you activated Artec Studio online as Artec Studio Installation describes. Artec Studio installations activated offline cannot be deactivated.
Note
The number of deactivations may be limited, so deactivate Artec Studio only if you absolutely must move it from one computer to another.
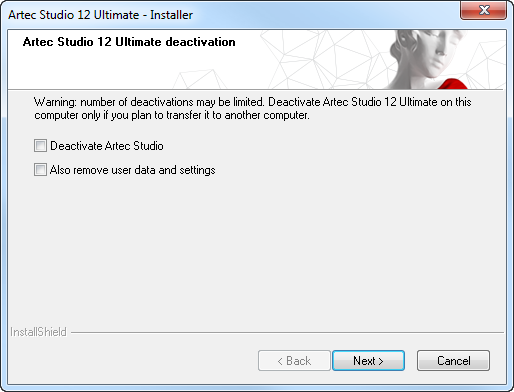
Figure 37 Deactivation of Artec Studio.
To deactivate a license on your computer, follow these steps:
- Make sure the computer is connected to the Internet.
- Go to Control Panel → Uninstall Applications and click on Artec Studio. The uninstallation process will start.
- The dialog shown in Figure 37 will appear. Select the I understand. Deactivate Artec Studio on this computer checkbox.
- Click Next to complete the uninstallation.
Managing Artec 3D Scanners and Products
Artec Installation Center manages applications and 3D scanners linked to your account.
It’s a multifunctional supplement to Artec Studio that connects with my.artec3d and helps you install new applications, download updates and manage your 3D scanners. To launch Artec Studio for the first time, you must log into my.artec3d. After this one-time authentication, you need not provide your email address or password each time you launch the application.
When Artec Studio launches, Artec Installation Center checks for new updates; if an update is available for any installed product, the software will display a notification like the one shown in Figure 38.

Figure 38 An Artec Studio update is available for download.
Once you log in, Artec Installation Center displays information about your products.
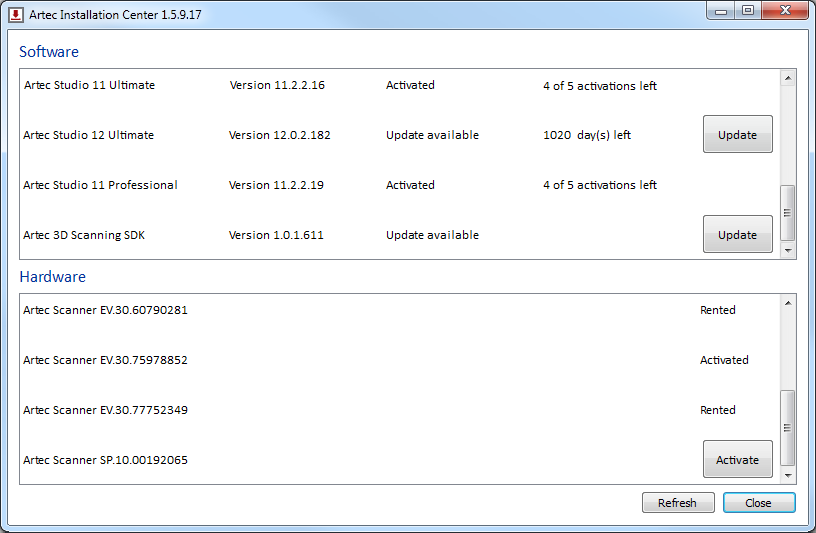
Figure 39 Artec Installation Center.
The Software section of Artec Installation Center provides all information about your software products:
A list of all applications available to you
Activation status of each application (application may or may not be activated)
Total number of activations and number of activations you’ve used so far
Activate, Install or Update buttons for any of these actions that are currently available to you
- Install—appears if the software is not installed on the computer (installation usually means activation)
- Activate—appears if the software is not currently activated on the computer. Activation decreases number of licenses by one for each computer.
- Update—appears if a new version of installed software is available for download
The Hardware section contains a list of the scanners that you own or have otherwise connected to your computer. For the first case, the Activated status or Activate button will be displayed, while in the second case, the Rented status or Rent button will be displayed.
A row of buttons appears at the bottom of the Artec Installation Center window:
- Refresh
- —refresh the data displayed by Artec Installation Center
- Close
- —exit Artec Installation Center
Getting Started With Artec Studio
Main Window
You can launch Artec Studio in several ways:
- Click the desktop icon
- Using the Start menu, click Start → All Programs → Artec Group → Artec Studio Professional/Ultimate 11.
When you launch Artec Studio, you will see the main application window, which allows you to perform all operations on scans and models. The main window is divided into several sections (see Figure 40): 3D View, Side panel, Left panel (figure depicts optionally open Tool panel), Workspace and Log as well as menu bar and status bar (not marked in the figure). Other windows may appear temporarily as well.

Figure 40 Main window of Artec Studio.
The 3D View window displays all 3D data. You will use this window regularly. When the application launches, a coordinate grid with coordinate axes will appear in the center. Your scans and models will employ this global coordinate system.
To the left of the 3D View window is a side panel that contains icons for various application modes, including Scan, Autopilot, Editor, Tools, Align, Fix holes, Measures, Multi, Texture and Publish. These modes are mutually exclusive: the application can work only in one of them at any given time, except for Autopilot. Some modes will lock the Workspace panel when you use them. The main application modes are Scan, Autopilot, Editor, Tools and Align.
At the top of the 3D View window is a context-dependent 3D Tools panel containing the following commands: Home, Fit to view, Grid, Lighting, Color, Render mode, Shading and Backface. Editor mode includes several additional tools: Select through, Positioning, Move/Rotate/Scale, Smoothing brush, Eraser, Defeature brush and Texture-healing brush.
The Workspace panel displays and manages all data uploaded to the application. Here you will find your scans as well as project-manipulation commands, such as saving, erasing, moving and renaming. You can reveal the hidden Workspace panel by clicking  at the top right of the 3D View window (see Figure 41).
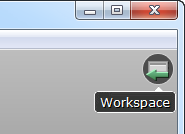
Figure 41 Button to reveal Workspace panel.
The Log panel sits at the bottom of the application window. The log is the software’s report on any executed commands, specifying the time and details of each operation. It also stores all error and troubleshooting messages generated by the algorithms.
The status bar contains information on memory availability and current usage by Artec Studio. It also has a progress indicator for any currently running task, such as algorithm execution, model and scan exporting, and so on.
Primary Settings
To access the settings dialog, select Settings... in the File menu. The settings window has several tabs for various groups of application settings. To switch between the tabs, click the icon at the top of the dialog. For a detailed description of the tabs, see Settings.
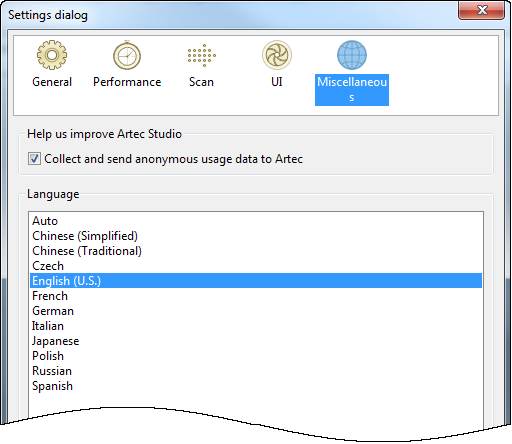
Figure 42 Language selection through Settings.
Under the Performance tab you can specify the maximum number of alterations to be saved, or specify maximum the size (in MB) of the history to be saved. The Data-compression level slider enables you to adjust the compression level when saving project data to a disk.
To change the language, select the Miscellaneous tab (Figure 42) and then the required language from the list and click OK. You will be asked to confirm the operation and restart the application. Once you agree, Artec Studio will automatically restart using the new interface language, but you will lose all unsaved data. If you choose not to restart, the changes will be applied the next time you start the application.