Settings
This chapter describes Artec Studio settings that you can change through the Settings dialog. To display this dialog, select Settings… from the File menu or hit the F10 key.
The user-adjustable settings are divided into categories under separate tabs. These categories include the following:
- General
- Performance
- Scan
- UI
- Miscellaneous
General
The General tab contains basic Artec Studio settings and includes the following options (see Figure 150):
- Project-storage folder
- Autosave options
- Import/export options
- Default import units and Default export units
- View control settings
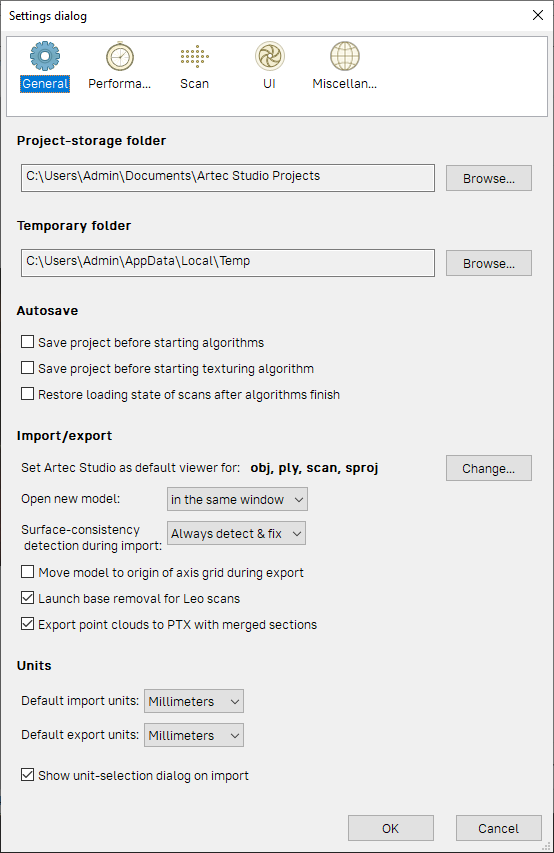
Figure 150 General settings page.
Project-Storage Path
Project-storage path is a default path which Artec Studio will use in the project saving dialog (Saving a Project).
The default location is Windows user’s Documents folder.
You can alter this path by editing the field content or clicking Browse… and afterwards specifying the required folder.
Temporary Folder
A newly created and yet unsaved project is stored at the location specified in the Temporary folder field. The default path is the Windows temporary folder. To change this folder, use the Browse… button or enter a new path in the field.
Artec Studio automatically clears project folder. You can access Windows temporary folder and remove the unwanted projects as necessary.
- Open the Explorer window.
- Type
%temp%in the address bar and hit Enter. - Locate folders that have GUID names in braces
{ }.
Autosave Options
When the Save project before starting algorithms option is enabled, the application will always save your project before running any processing routines. The Restore loading state of scans after algorithms finish checkbox allows you to control loading of selected scans once the algorithm is complete. Artec Studio always loads selected scans into memory before launching an algorithm; if a scan is not loaded at this point, the application will automatically save it to the hard drive after the algorithm finishes, freeing up memory. For more information about autosaving projects, see Autosaving a Project.
Registering Artec Studio as Default Viewer
Artec Studio supports various file formats. To make it the default application for supported formats, click Change… and select the formats you want the application to open by default (see Figure 151):
| *.sproj | Project files for Artec Studio |
| *.scan | Single-scan export/import format |
| *.ply | Format for saving polygonal models obtained using 3D scanners |
| *.stl | 3D-model export format for fast-prototyping equipment |
| *.wrl | Virtual-reality files in VRML 1.0 and VRML 2.0 format |
| *.obj | Texturized 3D models; Wavefront OBJ format |
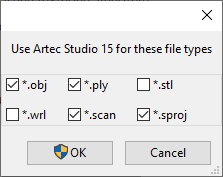
Figure 151 Making Artec Studio the default application for various file types.
For more information on importing and exporting files, see Exporting Models, Scans and Point Clouds and Importing Models and Scans.
Opening Files
Artec Studio can serve as the default viewer for SPROJ, SCAN, PLY, STL, OBJ and VRML (*.wrl) formats. To open each subsequent file in a new application window, select Open new model in a new window. If the Open new model in the same window option is selected, Artec Studio will use existing windows to display subsequent files.
Surface-Consistency Detection During Import
The Surface-consistency detection during import option instructs Artec Studio to examine imported files for defects. Select one of the following parameters:
Do not detect. Disable automatic surface-consistency detection.
Detect & ask. Enable automatic surface-consistency detection; Artec Studio will prompt you to start defect correction.
Always detect & fix. Enable automatic surface-consistency detection and correction.
Model Placement
When exporting, the application can automatically center scans and models on the origin of the axis grid. To enable this option, select the Move model to origin of the axis grid during export checkbox. If the checkbox is cleared, the application will save the model’s current placement on the axis grid when exporting surfaces.
Base Removal for Leo Scans
The Enable automatic base removal option in the Scan panel only works for scans from Eva and Spider and other handheld scanners connected to computer. To enable automatic base removal for scans from Leo, select the Launch base removal for Leo scans checkbox. The algorithm will start after the application imports that project.
Point-Cloud Export
The Export point clouds to PTX with merged sections ensures a successful import of the exported files in third-party software products. See Merging Sections.
Units
In Artec Studio, all software operations use millimeters as the default measurement unit. If you need to import or export a model in other units, change the settings under Units. The software applies these settings only when importing or exporting a model or a point-cloud scan.
Selecting the Show unit-selection dialog on import option enables you to choose on import which measurement unit was used to create the scan (see Figure 152). Artec Studio supports units of millimeters, centimeters, inches and meters. If in most cases you import data in a particular measurement unit, but you might occasionally import models created using another unit, you should enable the Only if object is less than __ mm option and enter the threshold value. In this case, the unit-selection dialog will only appear if the model dimensions are below the threshold value.
The Default import units and Default export units dropdown lists determine the default measurement units for importing and exporting models. When exporting point-cloud scans (Artec point cloud and Leica Geosystems Cyclone Point Cloud), application will ignore the specified units. See Exporting Point Clouds for details.
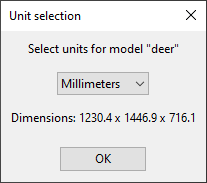
Figure 152 Unit-selection window.
View-Control Settings
Artec Studio allows you to use Scroll wheel to zoom in on the model in the 3D View window. You can take advantage of this capability in two ways:
- Clear the Mouse-wheel zoom to cursor checkbox to enable zooming to the center of the screen. In this case, you must keep the target area in the screen center and readjust its position from time to time.
- Select the Mouse-wheel zoom to cursor checkbox to enable interactive zooming to the mouse-cursor position. In this mode, you need only keep the cursor on the target area while spinning Scroll wheel forward and backward.
Performance
The following parameters are user adjustable by way of the Performance tab (see Figure 153) multithreading, memory usage, command-history storage, compression levels for stored data, texture-recording mode and Real-time fusion settings.
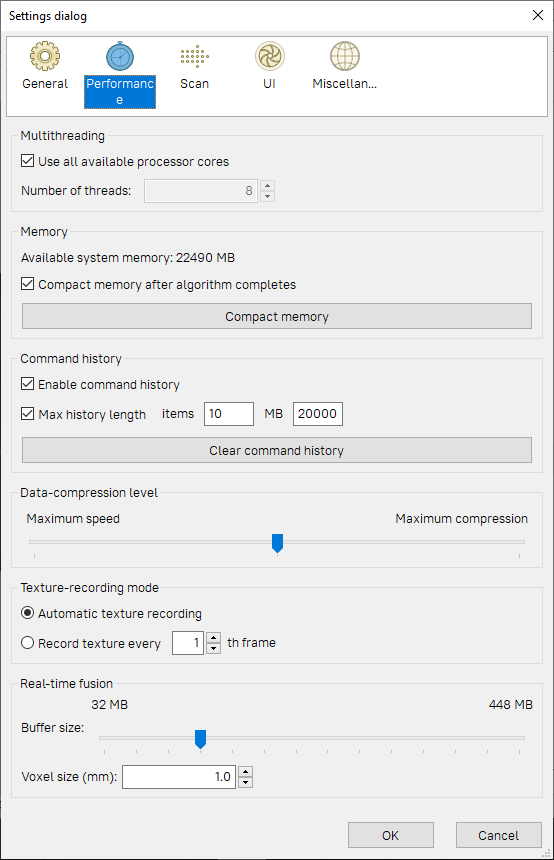
Figure 153 Performance-tab options.
Multithreading
On computers that feature multicore processors, Artec Studio uses all cores by default. If you would like to limit the number of cores the application employs, clear the Use all available processor cores checkbox and enter the number of concurrent threads manually.
Memory
Under Memory, the Settings dialog shows RAM availability. If the current amount is insufficient, you can try to increase it by clicking the Compact memory button. Artec Studio will clear the command history and attempt to optimize memory allocation. Clicking Compact memory won’t permanently delete the history, but simply unload it from memory. The Undo command will reload it. For more information about saving projects, see History of Project Changes.
Note
You cannot unload the command history from memory if you haven’t saved the project. Save the project and try again.
Artec Studio automatically optimizes memory allocation after each algorithm finishes. This function is handled by the Compact memory after algorithm completes checkbox. In contrast to the button, it doesn’t unload command history.
Command History
Under the Command history section you can limit the amount of history Artec Studio will save. By default, the maximum values are set as a certain number of commands and size on disk (in MB). If necessary, you can clear the Max history length checkbox. Doing so means the program will save all history for each project from the beginning. You can clear the project history by clicking the Clear command history button; the application will prompt you to confirm this action.
Note
Once you clear the history, you cannot return to an earlier project version.
Data-Compression Level
The Data-compression level slider allows you to change the amount of file compression when saving data. Higher compression saves disk space, but loading and saving these scans takes longer.
Important
Maximum compression settings are optimized to ensure that the shape of your models and frames will be preserved. Insignificant deformation may, however, occur. Change the slider position as necessary.
| Slider Position | Type | Compatibility | Output File Size |
|---|---|---|---|
| Left | No compression | All versions | Large |
| Middle | Medium compression (lossless) | All versions | Medium |
| Right | Maximum compression (lossy) | Artec Studio 12 and later | Small |
Texture-Recording Mode
By default (Automatic texture recording enabled), Artec Studio doesn’t capture texture for every frame. You can, however, manually specify the frequency for capturing texture frames by using the spinner in the Record texture every __th frame option.
Real-Time Fusion Settings
Real-time fusion offers two optional settings (see Scanning With Real-Time Fusion):
Voxel size (mm). The fusion resolution. It affects the algorithm’s performance and quality. The lower the value, the sharper the shape of the model. Note that specifying low values may produce noisy surfaces.
Buffer size. Amount of GPU memory employed to reconstruct a Real-time fusion object in the scene. The default value depends on the computer’s available GPU memory. Note that Artec Studio may fail to correctly determine the upper limit if your computer has an Intel HD Graphics card. The more memory you have, the larger the scene you can scan in Real-time fusion mode. The slider doesn’t define the total finite memory size, however; the algorithm employs system memory (RAM) when GPU memory is consumed.
Note
Avoid altering the Buffer size unless you have started noticing artefacts while scanning.
Scan
The Scan tab allows you to edit the parameters that the application uses both while scanning and while postprocessing the results (see Figure 154).
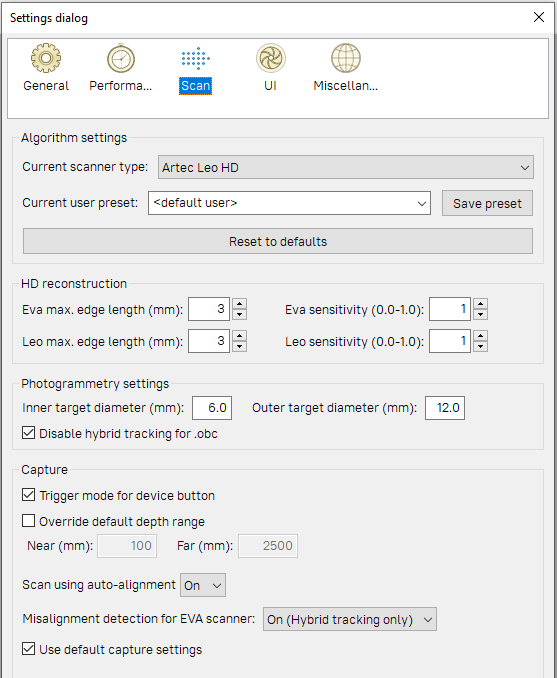
Figure 154 Scan-settings tab.
Algorithm Settings
Artec Studio automatically selects and displays settings for each scanner type in the Current scanner type dropdown of the Settings dialog and in the Preset dropdown of the Tools panel. If it fails to correctly identify your scanner type or you process scans from different scanners, select the appropriate scanner type manually. To reset all settings to their default values, click Reset to defaults.
Current user preset allows you to save the current parameter values in the Tools panel. By selecting a saved preset, you can change all settings at once. Note that this option applies only to the selected device type.
HD Reconstruction
When using Artec EVA or Artec Leo in the HD mode, you can adjust the following parameters that influence the results of the HD reconstruction:
The maximum edge length (in mm) of the polygons used for the HD reconstruction
- Eva max. edge length (mm)
- Leo max. edge length (mm)
Sensitivity
- Eva sensitivity (0.0-1.0)
- Leo sensitivity (0.0-1.0)
Higher sensitivity results in more detailed reconstruction of scanned surfaces, on the one hand, and in higher noise level, on the other:
- sensitivity of 0.0 means maximum noise filtering
- sensitivity of 1.0 means no noise filtering
You can vary the sensitivity with the step of 0.01.
Photogrammetry Settings
Photogrammetry settings allow you to define the target size. Inner target diameter (mm) corresponds to the diameter of the white circle in the middle of the target; Outer target diameter (mm) corresponds to the outer diameter of the target’s black ring. The most popular targets have diameters of 6 mm and 12 mm; the values 5 mm and 10 mm correspond to the Scan Reference target. See Target-Assisted Scanning for details.
The Disable hybrid tracking for .obc checkbox ensures that tracking is purely based on targets. Select the checkbox if you don’t want the texture and geometry features to assist target scanning (Using Photogrammetry Solution (Scan Reference)).
Capture
The Capture section covers settings related to the trigger button for the Artec MHT scanner, as well as the scanning-depth range and individual frames acquired during the scan.
The first option is the Trigger mode for device button checkbox, which changes the button behavior on the Artec MH and Artec MHT scanners. For details regarding these buttons, see Scanner Buttons and Capture Modes.
The scanner has a defined depth range. If it’s too close to the object, it may fail to capture all or part of the object. On the other hand, if the scanner is too far away, various types of 3D “noise” will appear in the scene, complicating the postprocessing effort and affecting the final results. Therefore, you should position the scanner as close as possible to the object without crossing the cutoff plane. Default settings for each 3D scanner contain minimum and maximum limits within which you can position the cutoff planes. The scanner model determines these values. If you are using an Artec L scanner or 3D-sensor and high accuracy is of lesser importance, however, you can adjust the depth boundaries manually, allowing you to scan closer to or further from the object than the recommended distances indicate. To this end, mark the Override default depth range checkbox and enter new range values.
Warning
Redefining the depth range may reduce accuracy.
Scan Using Auto-Alignment
The Scan using auto-alignment option is enabled by default and is covered in the Resuming Scan After Lost Tracking and Auto-align new scans with those marked in Workspace sections. The application’s behavior varies depending on this option’s value, as Table 22 shows.
| Scan Using Auto-Alignment | On | Off |
|---|---|---|
| Tracking Mode | Geometry + Texture | Geometry or Geometry + Texture |
| Audio Notification? | Yes (see Audio Notification) | Yes |
| Message in 3D View | Searching for position: Point 3D Scanner at the object to continue | Tracking lost: Repeat scan using slower motions or additional features |
| Instructions | Direct the scanner at any already captured region with sufficient texture, maintaining the original scanner orientation relative to the object | Direct the scanner at the last captured region |
| Data Recording | Handled in a newly created scan | Handled in the same scan |
Misalignment Detection
In some cases, Artec Studio may incorrectly determine relative frame positions, resulting in misalignment. When this error occurs, you must restart the scanning session and remove the misaligned scans. Alternatively, you can attempt to fix the misalignment by breaking the scan into several segments. Further information about addressing this problem by dividing scans is available in Separating Scans. To prevent possible misalignment and improve your scanning experience, Artec Studio features a Misalignment detection for EVA scanner setting that functions during the scanning process. However, if you have difficulty maintaining the tracking when scanning particular objects, you can disable this setting.
Options are as follows:
- On (Hybrid tracking only). The default value, option works for Geometry + Texture tracking mode.
- On. The option works for all tracking modes, including Geometry.
- Off. The option is turned off for all trackers.
Default Capture Settings
Artec Studio allows you to change the characteristics of single-frame surfaces as the scanner captures them. To change the default parameters, clear the Use default capture settings checkbox and change the settings manually in the displayed window. The options below are user adjustable:
Important
We recommend using default settings. Poorly chosen settings may reduce data quality.
Triangles step. Point density for a frame mesh.
Minimum object size. The smallest object scanned, by number of polygons.
Length filter threshold. Triangle-filtration threshold by edge length (maximum possible size in mm).
Interpolate. Use interpolation for parts of surface that are missing data.
Max interpolated length. Maximum size of areas to be interpolated (in mm).
Max angle. Triangle-filtration threshold by maximum angle (in degrees) between the triangle’s normal and the camera’s sight vector.
Geometry registration threshold. The higher the threshold, the stricter the quality requirements for the geometry being scanned. Therefore, determining the proper geometry in the scene is more difficult in such cases. Subsequently, Artec Studio runs geometry registration less frequently, making way for texture registration. Works with Geometry + Texture tracking only, values are between 0 and 1.
UI
The UI page allows you to edit user-interface settings (see Figure 155) and covers the following categories:
- Audio notification
- Workspace colors
- Warnings
- Surfaces that Artec Studio displays during a scan
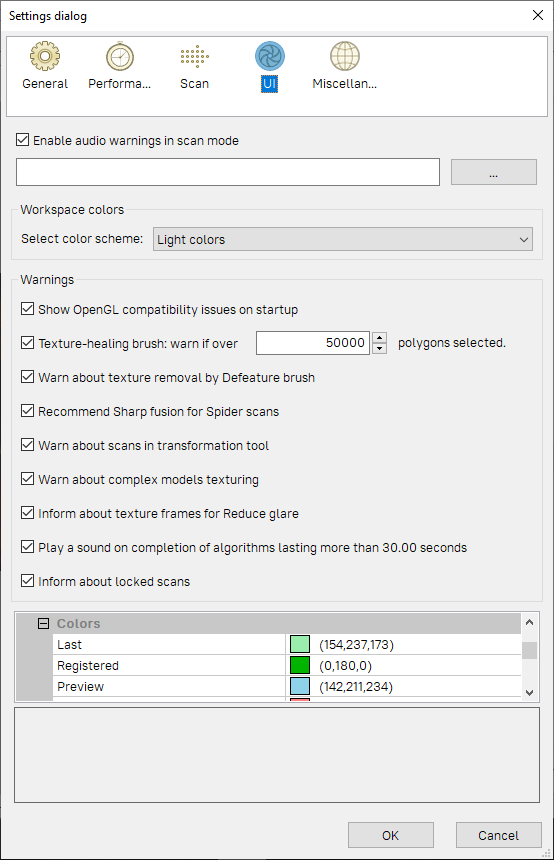
Figure 155 Interface-settings tab.
Audio Notification
Sometimes, automatic alignment in real time is impossible during the scanning process, and the program is unable to align the previous frame with the current one (see Resuming Scan After Lost Tracking). When this situation occurs, Artec Studio issues an audio warning that stops once you reposition the scanner and the software again finds its location in 3D. To enable or disable this feature, use the Enable audio warnings in scan mode checkbox. A standard “beep-sound” is the application’s default sound. You can choose any WAV file as the warning sound. To this end, click the … and specify a file path.
See also
Workspace Colors
Artec Studio automatically chooses display colors for newly created scans. You can select any of the standard palettes:
- Full palette
- Light colors
- Web-safe colors
- Random colors
- Monochrome
Warnings
The Warnings options allow you to toggle certain notifications. They include the following:
Startup Checks
Show OpenGL compatibility issues on startup. Artec Studio requires OpenGL version 2.0 and some OpenGL extensions to function properly; your PC may or may not currently support these capabilities. Selecting this option activates a display window on startup containing information regarding possible missing extensions.
Warnings in Tools and Editor
If you are familiar with these algorithm peculiarities, you may disable these notifications.
Texture-healing brush: warn if over __ polygons selected. This checkbox instructs the application to display a warning if you exceed the maximum number of polygons to be inpainted at one time. This limit reduces the potential for the computer to hang up. Specify a suitable value for your system, or clear this checkbox if you require no warnings of this kind.
Warn about texture removal by Defeature brush. Be ready that Defeature brush won’t preserve texture in the corrected areas, so the application notifies you of this.
Recommend Sharp fusion for Spider scans. Artec Studio will recommend switching from Smooth fusion to Sharp fusion for scans from Spider, since the latter yields more detailed models.
Warn about complex models texturing. If you are attempting to texture a high polygonal model, Artec Studio will suggest that you simplify it first.
Warn about scans in transformation tool. We advise that you refrain from repositioning source scans as it may result in the incorrect texture application. The message may remind you about it.
Inform about texture frames for Reduce glare. Since this option in the Texture panel requires many texture frames, Artec Studio will advise you to adjust frame-recording settings.
Play a sound on completion of algorithm lasting more than 30 seconds. This setting allows you to get distracted while the application is busy running algorithms and performing commands. Once the application finishes any of these processes, it chimes.
Inform about locked scans.
Artec Studio will remind you that some of the scans selected for Global registration have  or
or  marks (see Workspace Panel). This message allows you to unlock them or run the algorithm without changing scans’ status.
Displaying in 3D View Window
You can change the way you see surfaces and points during the scanning process, adjust their colors as well as the background color, and specify the mode for frame playback. To these ends, use the settings below:
Display
Last scanned surfaces. Number of visible surfaces most recently captured that will appear in 3D View during scan.
Visible surfaces. Total number of visible surfaces displayed during scan (equal to the number of most recently scanned surfaces plus the number of key frames to display).
Disable smart simple rendering mode. Smart simple rendering mode ensures that 3D content is rendered without simplification if computer resources allow it. Once the system experiences lags, it automatically turns on simplification.
Polygon limit for conventional simple rendering mode. Maximum number of polygons in the viewport beyond which Artec Studio will switch to simple rendering mode during 3D navigation.
Point-cloud polygon limit. If the polygon count of a point-cloud surface exceeds the specified value, Artec Studio will render a simplified copy of this surface having no more than specified polygons.
Spherical target diameters.
List of diameters of the target spheres used during scanning with Ray. Use semicolon ; as a delimiter between values in millimeters in the field.
Point size. Number of pixels for rendering each point when using the Points or the Points and solid rendering mode.
Animate movements. It shows movement of the 3D data when Artec Studio repositions or reorients it. Disable this option on slow computers.
Colors
Last. Color of last scanned surfaces.
Registered. Color of correctly aligned surfaces.
Preview. Color of surfaces in preview mode.
Dropped. Color of unaligned (and thus dropped) surfaces.
Key frames. Color of key frames (surfaces).
Screenshots
You can specify the default screenshot size in pixels (see Saving Screenshots):
- Width
- Height
If your system configuration is incompatible with the specified settings, Artec Studio will save a screenshot of the maximum possible size.
Playback
See also
Repeat. Continuously loop the frame sequence in the surface-view mode of the Workspace panel.
FPS. Speed (in frames per second) at which frames appear during playback.
Background
Color. Background color; the application may automatically alter this color in certain modes, such as X-ray.
Dropped color. Background color when misalignment occurs while scanning.
Texture. Display patterned (chessboard pattern) or plain background.
Gradient. Gradient or monochrome background color.
Background for screenshots. Application will use this background color when saving screenshots, the actual background color will remain unaltered.
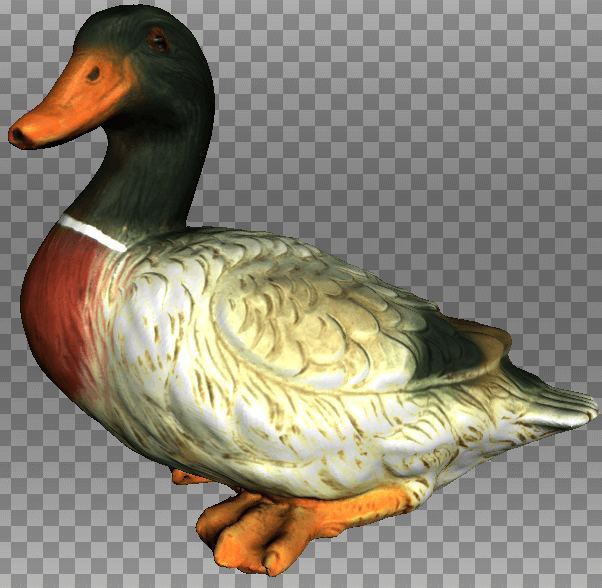
Figure 156 Example of altered background.
Welcome Screen
Don’t show. Disable the welcome screen.
Autopilot
Don’t show greeting screen. Disable the Autopilot screen showing the steps to pass in this mode
Miscellaneous
Usage Information
You can help us improve the quality and performance of Artec Studio by allowing us to collect and send usage information to Artec Group. This information will not be used to identify you, and it excludes your project data, 3D surfaces, textures and any other data that you obtain and process using Artec Studio. By default, the Collect and send anonymous usage data to Artec checkbox is selected. We recommend leaving this checkbox marked so we can better improve the application.
When installing Artec Studio, you can decide whether you want it to collect and send usage data. The same checkbox described above also appears in the final installation dialog (see Figure 35).
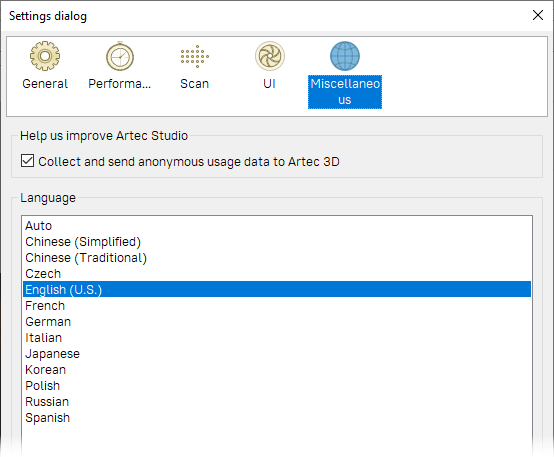
Figure 157 Miscellaneous-settings tab.
Language
The Artec Studio interface supports several languages:
- Auto—automatic language selection on the basis of system settings
- Chinese (Simplified)
- Chinese (Traditional)
- Czech
- English (U.S.)
- French
- German
- Italian
- Japanese
- Korean
- Polish
- Russian
- Spanish
To switch between languages, choose the one you want and click OK. The program will then prompt you to restart. If you agree, the application will restart automatically using the newly selected interface language. If you choose not to restart, the changes will take effect the next time you start the application.
Note
To change the language, Artec Studio must restart.