Processing
Obtain Scans
Once the scanning is over, the Ray scan panel will close and the scan import will start.
A point-cloud scan will appear in the Workspace panel.
Once the scanning is over, follow the steps below:
Open the scanner door. For more information, refer to Installing microSD Card.
Push the micro SD card into the slot until you hear a click.
Take the card out of the slot.
Insert the card into a card reader and connect it to the computer
Copy project folder to some folder on the computer.
Open Artec Studio.
Hit Ctrl + I or select the following menu command: File → Import → Scans, meshes or point clouds.
Navigate through folders to
C3Dfile, select it.Click Import. Application will start importing the scan and extracting information on the spherical and checkerboard targets.
A point-cloud scan will appear in the Workspace panel.
Once the autonomous scanning is over, follow the steps below:
Open the scanner door. For more information, refer to Installing microSD Card.
Push the micro SD card into the slot until you hear a click.
Take the card out of the slot.
Insert the card into a card reader and connect it to the computer
Copy project folder to some folder on the computer.
Open Artec Studio.
Hit Ctrl + I or select the following menu command: File → Import → Scans, meshes or point clouds.
Navigate through folders to
C3Dfile, select it.Click Import. Application will start importing the scan and extracting information on the spherical and checkerboard targets.
A point-cloud scan will appear in the Workspace panel.
Recommended Processing Steps
Before you start processing your point-cloud scans, ensure that the Current scanner type is Artec Ray.
Editor
You may want to crop your scanned data leaving out unwanted areas.
Launch Editor → Eraser.
Mark the Select through checkbox.
Select the regions that you intend to preserve in the output.
Click Inverse to invert the selection. That is the way to quickly select unnecessary data.
Click Erase.
Global Registration and Alignment
Scans from Ray also need to be registered using Global registration (see Tools). For algorithm to run successfully, the scan needs to be captured with targets with the enabled respective options. If no spheres or checkerboard targets were present during the scan, opt for Align.
Inspecting Quality Of Targets Clouds Registration
To increase the accuracy of scanning with targets and give users more control and flexibility, an ability to manually inspect the quality of target clouds registration is implemented in Artec Studio.
During scanning, each reference target is captured in a number of frames. The result of target capturing in a particular frame is called an instance. All instances representing the same target are grouped into a cluster. During global registration, Artec Studio calculates the deviations of each captured instance and cluster from the corresponding targets of the reference target cloud.
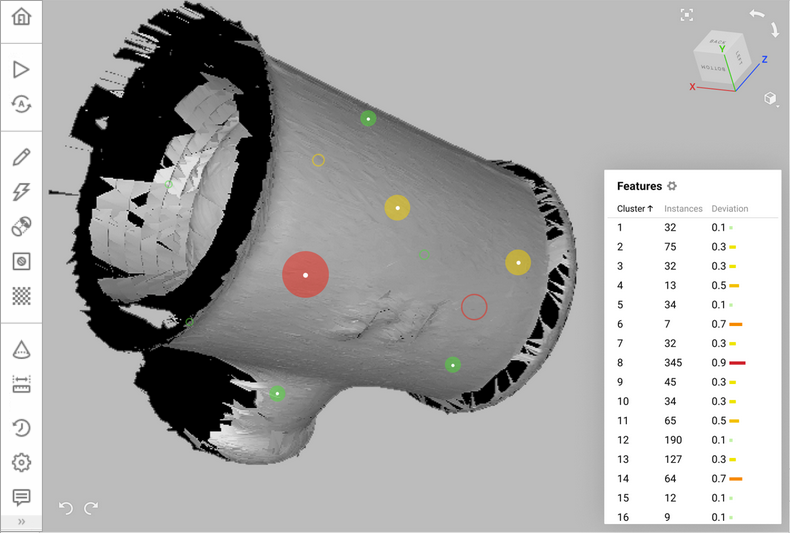
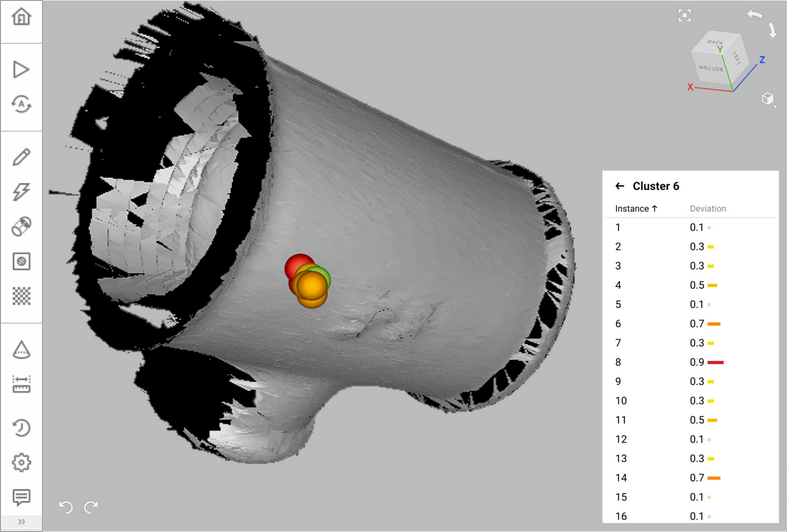
The deviation values are listed in the Features Panel. They are also shown in the 3D View window. For every instance, its position, its center and deviation can be viewed. The size and the color of the target represents how much it deviates from the reference position.
You can evaluate the deviation of each instance or cluster and exclude badly registered targets from the consideration of the global registration algorithm.
Features Panel
By default, the Features panel is available above the Properties panel at the bottom of the Workspace panel. It contains the list of clusters and instances of all targets captured during scanning, including deviations from their reference positions.
For the Features panel to display the list of captured targets, you need to select proper objects in the Workspace panel. These can be one or more scans with the global registration applied and/or the reference target cloud.
Tip
To work easier with the Features panel, drag it to the area of the 3D View window.
Evaluating Deviations
For each cluster and each instance inside the cluster, Artec Studio calculates its deviation. The value of the deviation depends on the type of objects selected in the Workspace panel:
With one or more scans and the reference targets cloud selected, the deviation is calculated against the position of the corresponding reference target.
With only scans selected, the deviation is calculated against the average position of the captured instances of the reference target.
With only the reference targets cloud selected, no deviation is provided.

Figure 26 The list of instances belonging to a cluster and their deviations are displayed in the Features panel and in the 3D View window.
You can inspect the deviation of the entire cluster or analyze any of its instances separately. To view the list of instances inside a cluster, click the Next icon to the right of the number of instances. To return to the list of clusters, click All clusters.

Figure 27 The list of clusters and their deviation displayed in the Features panel and in the 3D View window.
Removing Badly Registered Instances/Clusters
To remove a badly registered target instances or clusters from further registration process, follow these steps:
In the Features panel, select one or more instances or clusters of the desired scans.
Open the context menu by clicking RMB on the selected object(s) and click Delete. You can also press Delete on the keyboard.
After you have excluded the selected targets, re-run the Global registration algorithm.
Note
You can also measure distances between individual instances in the targets cloud using the Measurement tool.
Obtain Model
To obtain a model, use either Sharp fusion or Smooth fusion (Tools panel, Fusion). However, the fastest way to obtain a simplified polygonal mesh is through using Ray scan triangulation.
Fusion |
Triangulation |
|
|---|---|---|
Number of scan to process |
Any |
1 |
Speed |
Slow |
Fast |
Memory consumption |
High |
Moderate |
Hole filling |
Possible |
Impossible |
Accuracy control |
Through resolution |
Through the set of parameters, chiefly decimationStep |
Export Data
Point Cloud
To export a point cloud as it is, mark a point-cloud scan in Workspace, select File → Export → Point clouds and then choose the required format. Universal formats are PTX and XYZ.
When exporting to PTX, ensure that the Merge sections during export to PTX checkbox is selected in Artec Studio settings. This option merges all sections together in a single one ensuring a successful opening in third-party pieces of software.
Mesh
To export 3D-data as a polygonal model, first mark the output of the Fusion algorithm, then select File → Export → Meshes.