Preparation
Place the scanner where you intend to scan the object or area.
Ensure your computer or mobile device is connected to Artec Ray and the scanner is turned on.
Estimate an approximate distance to the surfaces you want to scan.
Important
For the highest accuracy, turn on the scanner 5 to 10 minutes before you begin so it can reach a stable operating temperature.
Choose Scanning Site
When choosing an optimal place to scan, ensure the following:
The site has enough room (a circle measuring at least 10 meters in diameter).
The scanner is protected from moisture or rain.
You have a place to wait outside the scanner’s field of view while it is capturing the scene.
The premises have power outlets to charge your laptop and batteries.
Prepare Objects and Scene
Since a lidar scanner measures reflected beams, the beams must reflect in approximately the same direction they are emitted. Surface reflectivity is an important factor for measurement accuracy. The table below lists a few surface types that may pose difficulties when scanning, as well as measures you can implement to compensate.
Type |
Recommendations |
|---|---|
Objects smaller than 5 centimeters at a distance of 100 meters |
Use Eva or Spider |
Plaster, bones, marble, granite and other types of stone |
Apply spray. Consult the FAQ for more details. |
Transparent and translucent surfaces |
Increase Sensitivity or measure 1 their transparency and apply spray as necessary |
Reflective or black surfaces (also dark green and dark blue) |
Increase Sensitivity or/and apply spray |
Surfaces lit by direct sunlight |
Shelter them from the sun and increase Sensitivity |
- 1
Although a surface may appear nontransparent to the human eye, the laser beam may penetrate it to some extent. You can approximate the object’s transparency by using a laser pointer and inspecting the spot of the laser beam on the object surface:
If the spot is a focused point, the transparency is low.
If the spot is large and has blurred contours, the material is probably transparent.
Place Targets
Almost every object must be scanned from several viewpoints. When scanning large scenes, a successful alignment requires immobile reference objects (targets) in each scan from each viewpoint.
The most common reference objects for Artec Ray are white matte spheres and checkerboard targets. Combining both types is beneficial. We recommend placing the targets so that no fewer than five (regardless of type) are observable from each viewpoint.
Spheres
When placing spheres, keep the following in mind:
The spheres must not form a line in any particular viewpoint.
The distance from Ray to the spheres should not exceed 15 meters. If it does, use checkerboard targets printed on larger sheets.
The greater the distance to Ray, the more the spheres are necessary (smaller ones should be in the middle of the scene, whereas larger ones should be at the far ends).
Do not obstruct a sphere’s north pole.

Figure 8 Placing spheres.
Checkerboard Targets
Texture checkerboard targets also help to align multiple scans. To use them, first download the e-book and print the targets. A large scanning distance may require printing targets on larger paper (A1 or A2).

When placing checkerboard targets, consider the following recommendations:
Targets must be firmly attached to the walls or other surfaces.
Targets must be positioned to avoid appearing at sharp angles (less than 40°) from the chosen viewpoint.
Avoid using duct tape to attach targets, as it may damage the paper.
Define Scanning Viewpoints
Depending on the object or scene you are scanning, decide how many scanning points (viewpoints) you need and where you will locate them. Below are some practical recommendations:
Ensure that the viewpoints together cover the entire object and that each one covers as much of the object as possible.
Ensure that no fewer than five targets are visible from each viewpoint.
Avoid moving targets when changing viewpoints.
Avoid placing the scanner closer than 5 meters from the object.
Adjust the scanner height so it can see all areas of the scene.
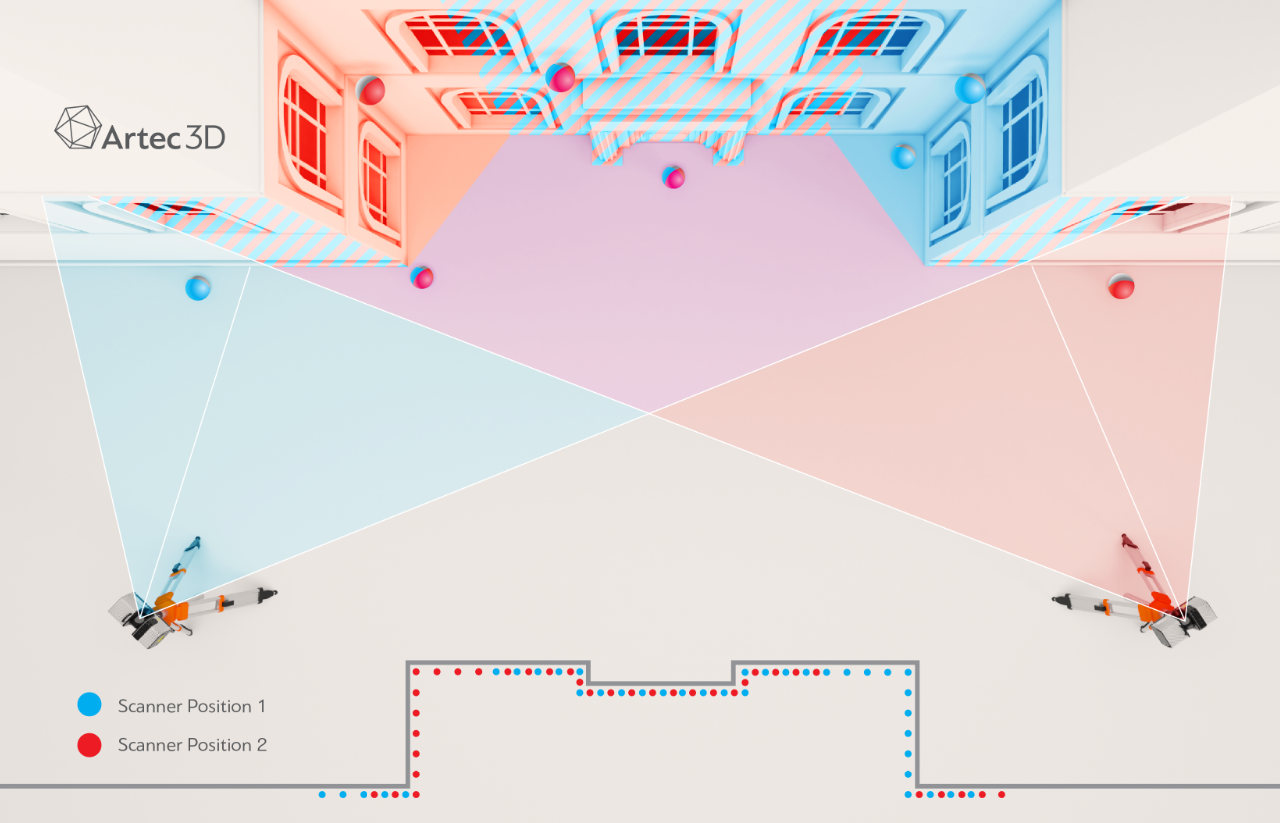
Figure 9 Two viewpoints of a scene containing spheres.